


By Jon Eakes
Many years ago, at a time when I regularly gave project and business management courses to renovators in Quebec, I was always amazed by how many small contractors claimed to make money on every job and yet admitted to not making much profit at the end of the year. Understanding all the expenses that go into a job is
often a mystery for beginners and still a difficult management task for many who have years of struggle behind them. With the tight margins that we often have to deal with, a clear understanding of the real costs of tools and products can make the difference between getting by and getting ahead—and budgeting can be as complicated or as simple as you need to make it.
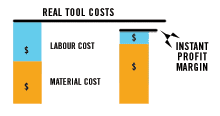
Understanding the real costs of products is actually simpler than the real costs of tools and equipment because, for the renovator, a product is used on only one job. On the product side, it is the homeowner who has to study amortization and lifecycle costs—buy more expensive shingles that last longer, or cheaper shingles that last long enough. There are, however, a number of products where it is the renovator alone who is concerned, or almost. If the labour required to install a product is less than the labour required to install another similar product, you could even have a higher material cost and a lower real product cost. In this case, you make an instant profit compared to traditional materials; so studying installation costs should be part of choosing products.
 |
Let me cite some examples from products, some of which I have talked about in past articles in this magazine.
Grip-H-Clips (March 2007 issue) are roofing panel clips that cost more than the metal ones but save time and errors and, in the words of one of our Canadian contractor testers, reduce the swear factor. For your client, they are even stronger—a real win-win choice. Drywall corner clips are a similar example; these little metal clips eliminate the need for secondary studding just to provide a nailing base in corners, saving both labour and costly lumber. The drywaller handles the corner quickly and easily rather than the framer doing it and wasting lumber.
When installing pre-finished hardwood flooring, using click-lock type engineered flooring rather than massive T&G lumber converts the job from a skilled specialized job to one that, once the first three rows are installed, a day labourer can finish competently. The labour time is not necessarily reduced, but the skill level and salary level changes while the results remain impeccable because the clip groove keeps it straight.
MaxTie, a re-bar tying gun (May 2007 issue) is so expensive that most small contractors don’t want to even look at it, but if you do a lot of wire tying for re-bar or hydronic heating, it not only cuts down labour time radically but avoids Workman’s Compensation problems with strenuous repetitive tasks. If you wrap a few ties occasionally, the labour savings won’t catch up with the capital cost over a pair of pliers; but if you do it all the time, a $3,000 tool is not expensive.
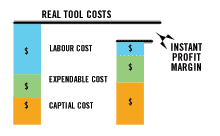 |
So, just as with products, the real cost of a tool is the purchase price (the capital cost) plus the labour cost to use it. And now we add in the expendables cost—the cost of gas or blades or fasteners. Better tools sometimes have more expensive expendables such as more expensive screws, but if the labour savings is enough, even a higher capital and expendable costing can be immediately profitable. Where analysing tool prices becomes complicated is that the tool exists over a certain period of time and, therefore, over many projects.
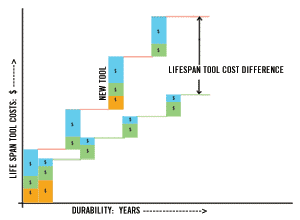
A quick look at this simplified chart of real tool costs over time shows that there are serious economies to one tool lasting twice as long as another. In this example, the labour savings already make a big difference the second year, but that difference plus the capital outlay difference (replacing the cheap tool in year 3) adds up big time by the end of the life of the quality tool. Of course if your tools get stolen before they get worn out, or if they don’t save a lot of labour, they aren’t worth the difference in purchase price. I am told that Hydro linemen buy cheap cutters because they lose them long before they wear out.
 |
So how do you figure this all out and still have time to build houses? If you are a medium to large company with a lot of people using the same tools on different sites you may want to look at systems like the web-based ToolWatch.com. This is an inventory and tool management system that is tapped into by office computers, site laptops, cell phones, etc., to keep track of who needs what and where, and minimizes redundancy by maximizing utilization of resources.
The majority of our readers, however, are managing a much smaller bank of equipment. The test to know if you need to do something differently than you are already doing is to honestly answer the question: Do you regularly find that tool and equipment purchases or replacements come as a surprise and create a cash flow strain?
If you answer “yes”, you need to work on better planning, no matter how big or small your operation.
Retrospective Budgeting
The complete lifespan tool cost analysis is usually too much trouble to do in a rigorous manner for smaller contractors, although you should keep it in the back of your head when choosing between quality and price. The simplest budgeting technique I have come across is what I call retrospective budgeting.
I recommend that the small renovator diligently keep track of all capital outlay for tools and equipment even if you do shoe box accounting; separate large equipment items like trucks from smaller tool items like tools. At the end of the year, determine what percentage of your gross revenue you spent on these items. Then make next year’s tool and equipment budgets based on the last one, two or three years of records. Don’t calculate or speculate too much; just keep track of what you actually spend.
If your business is stable and not growing, and you feel you have properly kept up your tools, use last year’s figures. If you are in a growth spurt or catch-up mode, up the tool budget by the percentage growth you expect. The objective here is that you know you will be spending this much before the year begins. Set that money aside from each job as, in fact, it is a hard cost just like the bill at the lumber yard. This way the cash will be ready when it is time to change out a tool. For some reason, this becomes easier to do when you are fully aware that this is exactly what you spent on tools last year, and the year before and, therefore, this is exactly how much you used up of your tools and equipment on each job. This same exercise can help you to properly price out your jobs as well.


